Sunday, August 1, 2010

365 Recipes - #41 - Breakfast Potatoes

POTATOES !!!

I love potatoes... they seem to go with everything, and honestly I can't pass them up in the store. I remember one time I was at my fav. little local Trader Joe's with a good friend of mine and she made the comment.... "you Irish, you never can pass up a potato". This made me laugh... cause in my case, it's so darn true!

Anyway, here is a simple way to make breakfast potatoes to go under your favorite type of eggs.


The Line Up:
Potatoes
Salt
Pepper
Butter


Now, the amount of potatoes you need will obviously depend on the amount of people coming to breakfast.  I guess I used about one of these per person, this one is a bit small, but it works, because this is really just a side dish.


I hand shredded the potato, skin and all, I feel there is no need to waist the skin, just wash it really well and shred away.


In a buttered pan (preferably a non stick one) I started with a regular pan, but realized I was not having any luck with that so I changed over to my non stick pan.


Use enough to a lot of butter, it's one of those things where the butter just helps... flavors the potato and helps with the browning of the potatoes.


I salted the potatoes to my liking....


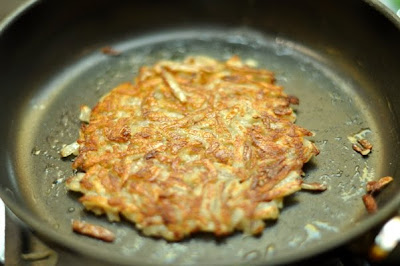
Then flipped them over (make sure you still have enough of that buttery goodness so the flip side gets a good fry as well.


This method helps... keeps everything from drying out... well at least for me it did.  And the added control of the heat helps cook the potatoes all the way through.


When its all brown and crispy and yummy, transfer the potatoes to a plate, then top them with your favorite style eggs... Scrambled, sunny side up, have fun with it!

ENJOY !
Recipe #41, 324 more to go.


.

Sunday, July 25, 2010

365 Recipes - #40 - Mini English Muffin Pizza

Mini Crispy Yummyness

Today was another hot one folks... but it did rain around 3pm and the temp came down a good 20 degrees... Ahhh to not be sweating just because your standing there... So since the temp came down I thought it would be OK to turn on the oven... for only a few minutes... I picked a few of my favorite topping to top off my mini pizzas, so you do the same, make them as wacky or as plain as you like !

The Line Up:
Original Sized English Muffins
(Pick Your Own Toppings Here is What I Used)
Pizza Sauce
Pesto Sauce
Black Olives (sliced)
Green Peppers (diced)
Tomatoes (diced)
Peperoni slices
Motz cheese (Shredded)
Fresh Basil
Diced Mushrooms

YUM !

Take a fork and separate the muffin in two.

Pop them in the toaster, or toaster oven... My campy toaster only toasts on one side, normally it's a pain in the butt, but for this recipe it's perfect. So toast them up on one side if you can, just enough to make the "Crannies" toasty.


Here is a shot of all the fixins' I used... yummy!

I found a miniature can of pre-sliced black olives, but you can slice your own, it's not to hard, oh and here's a trick... if you have a strong hard boiled egg slicer and your olives are ripe... you can slice the olives right in the egg slicer! Bam! Instant sliced olives :-)

I diced up about 3 baby bella mushrooms, you don't really need all that many mushrooms because the pizzas are well... mini.

I sliced up some tomatoes, I kept a few round slices and then diced up the rest.

I took one 3rd of a large green pepper and diced it up.


I put the muffins on a baking sheet, then sprinkled a little garlic powder on each one.

Then topped them off with different sauces... half with pizza sauce and the other half with basil pesto.

Then I topped each one a little different. Some were plain, some were veggie, some were "everything"... here is where you have fun and make what you like... Then pile as MUCH cheesy goodness on top ! ;-)

Mmmm Cheesy!

Then pop them in a pre-heated broiler on HIGH for about 3 minutes, or until the cheese gets all brown and crispy.

OK so I let mine cook a little beyond brown and crispy, but they were wonderful just the same! I enjoyed these little guys SO MUCH that I had 5, yes 5 my friends...

Have fun make them how ever you like !

ENJOY !


Recipe #40, 325 more to go.


.

Sunday, July 18, 2010

365 Recipes - #39 - Coffee liqueur Icecream Pie

Ice Cream and 91 degrees....

On what seemed to be one of the hottest days this July I decided to make an ice cream pie. Why you ask? Maybe i was in the mood for a challenge? Maybe I was just way to hot to think of the issues that come with extreme heat and ice cream... Maybe I just wanted something cold darn it!

This fun summer time treat is super yummy and very easy to make!


OK folks, I have to say this right off the bat... PLEASE remember to remove your polarizing filter from your camera lens when photographing food. I had a devilish time trying to fix these in post, and they still came out a bit drab, and dark... I wondered why I had to use my tripod. Maybe it was the heat? Yeah I'm going to blame my forgetting the filter due to the heat... Lesson learned my friends check your filters!... OK on to the pie !


The Line Up:

1/2 Container of Coffee Ice Cream (about .75qts)
Whipped Topping
4tbs Coffee Liqueur
1/2 cup Caramel Drizzle topping
1 Shortbread pie crust

I used a pre-made shortbread pie crust, because it was in the 90's and I really did not feel like turning on my oven. You can make your own, they are very easy, I'll post a how to when it gets cooler in my part of the woods.

Pick up your favorite coffee ice cream and let it soften for a bit, you do not want it melted, just soft enough to mix smooth.

Plop that in to a bowl, and if you were smart and it is over 90 degrees outside you would remember to place this bowl in another bowl that has some ice water in it, to keep the mixing bowl cool enough to slow down the melting of the ice cream... but not me... no I love to live life on the edge, I didn't need no stinking ice water... I just needed to move at the speed of light ! ;-)

Then take 3tbs of your favorite coffee liqueur... (you can use 2 or 2.5, but I wouldn't go over 3, coffee ice cream has a strong flavor to begin with... 3 is the max)

and mix it in to the melted ice cream...

Before it melts too much, pour it in to the pie crust and even it out.

Hopefully you didn't throw out the "lid", the plastic cover that comes with the pre-made pie crusts... if you don't have one, because you were cool and made your own pie crust, then just cover with plastic wrap, or tinfoil to form a tent so the ice cream does not freeze to the foil.


After about 2 hours you can start mixing the topping. I grabbed some pre-made whipped topping for this, again, I was too hot to make anything from scratch. I used maybe half of one of those containers... I think I just eyeballed it, it was about 4 heaping scoops.


Then mix in one tablespoon of the coffee liqueur, keep it quick and keep the topping as fluffy as you can...

Grab the pie out of the freezer...

I left the photo step out, but drizzle some of the caramel around on top of the pie before you put on the whipped topping...

Gently spread the whipped topping all around, make it as pretty as you like.

Then grab some more caramel topping and drizzle it around on the top. Pop this wonderfully coffee flavored frozen treat back in to the freezer.

In just a few hours it will set hard enough for you to cut pieces and serve...

Mmmm SOOOO good with a little fun punch of coffee liqueur goodness ;-)

ENJOY !


Recipe #39, 326 more to go.


.

Wednesday, July 7, 2010

Ice Pops !

Ok so this is not how to make an ice pop.... but rather what one looks like as you eat it!

:-)


Stay cool folks !

365 Recipes - #38 - Sun Tea

Grandma's Specality

Since it's over 100 degrees outside and the sun is scorching, I figured I would put all that heat and sunlight to good use. Here is a very simple cool and refreshing summertime drink I used to make with my Grandma years ago.

Sun Tea

The Line Up
Water
Tea Bags
Lemon
Sweetener
Glass Pitcher


Start with a glass pitcher with cold water. Here I used 10 cups of water.

Then I used 10 tea bags, here you can use any tea you like; tea bags, decaf, loose tea, herbal tea, the choices are endless.

Place the tea bags in the water, and then laugh at the fact that they don't sink in to the water right away because the water is cold, HA! But try to push them down a bit to get the process started.

Then cover the pitcher with either it's lid, or wax paper.

If it's a bright HOT day, the tea should be ready with in 45minutes, but you can let it sit up to an hour.

Here is a hot money saving tip. If you reuse the tea bags right away you can make another whole pitcher of tea! However I believe it will take a bit longer the second go around.

Give the tea a good mix, then add your favorite sweetener, I used a bit of agave here, but you can use white sugar or honey, or no sugar at all. I then added a teaspoon of lemon juice for some kick.

Then pour the tea over ice and enjoy !


Keep Cool!

Recipe #38, 327 more to go.